Wednesday, March 31, 2010

Lack of progress = increased frustration

We haven't made much progress. After the huge accomplishment of finishing the floor, we had to remove the two rear windows and lift zippy's behind with a 2x4 and some posts, as it was seriously sagging. That's pretty much all we did last weekend.

I'm feeling frustrated at the last of progress. It's not that we're not trying, there's just not enough time! And then there's other stuff that needs to get done on the weekends too, and then I'm moving, and then the 'rents are going to Cali and then, before you know it, it's June, Zip still can't move due to all his broken rotted bones, and then no camping and no store and what am I gonna do with all these boots??? Not to mention the General Wm might take precedent over the zipster. OH, what's a girl to do??

I wish I had more time, loads of money, and better carpentry skills.

Sunday, March 21, 2010

New Floor - FINALLY!

This was by far our most productive weekend yet! Despite the FREEZING cold wind and rain, we managed to get all the framing done on the floor!


We were on a roll, so after a quick trip to Home Depot to grab some insulation and plywood, we powered on.

The insulation going in...
I must have cut 9 million pieces of that stuff.

the plywood going down...

And by 11:30 Sunday, Zippy had a new floor!!


My dad was reattaching the metal bottom to the wood frame today and noticed that the rear of the trailer is starting to sag. More like the skins are sliding down over the actual trailer part. Is that normal? I mean, we know there's nothing really holding it up at this point, but it's a little scary that it could just slip off! Well, I guess that just means we'll have to get started on the frame now. :-)

Next time on the Adventures of Zippy Lee...

Figure out how to prop up the walls and roof so we can get started on reframing.


Sunday, March 7, 2010

More Polishing!

Bad weather and no dad - he had "other things to do"... whatever! :-) meant no real work on Zippy this weekend. So, of course, that meant more polishing.

New back window (thanks to Mike from CL) all clean and shiny!!

Just a small fraction of stuff needed polishing! See the tiny finished pile next to the chair? That's all I've done so far!

One of Zippy's wings, pre-polish:

And post polish:

Next time: I HOPE to finish the floor and door and maybe if we're lucky start on the framing. I know it's a a lot to wish for, but a girl can dream can't she?


Tuesday, March 2, 2010

Pretty Copper Lamp

I pulled this lamp out of Zippy when we were just starting the gutting process. Since I'm probably going to go with the electric only (no propane) option, I don't think I'll be putting the lamp back in, as it is in fact a gas lamp. So I figured I try to sell it on Ebay or something... Of course I had to clean it up first, which meant more polishing! Once I got through the 40 odd years of grime I realized it's actually super pretty!

Monday, March 1, 2010

Trailer Parts Organ Donor

My dad found an ad on CL for Vintage Trailer Parts $80.00. The ad showed Hehr windows, a few jalousies, a door, some drip caps, a table and some other misc. parts. SCORE. With hopes that one of the windows can be used as a replacement for Zippy's missing rear window, I made the long drive out to get the parts.

When I arrived I heard the sad story of how the parts came to be on CL. Mike bought a vintage trailer in great shape for his wife. He planned on doing a little bit of work and started with the replacing the floor. To do so, he had to disconnect the frame from the trailer, so he removed the skins. Around Christmas time, a wind storm hit and blew the skins around the yard, damaging them beyond repair. Mike's dreams of a vintage trailer for his wife were dead, so he decided to sell the salvageable parts to someone who might need them. Like a post Christmas miracle, Zippy Lee is the recipient of the precious organs from Mike's dead trailer. R.I.P. Mike's Trailer.


Rebuilding the door.

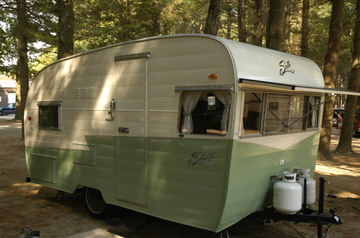
Saturday evening I decided to take the door off the trailer and take it apart. I could tell there was significant rot at the bottom, and I only had a few hours that evening and a few Sunday morning to get something done. The door seemed do-able.

I started by taking off the broken (!) and seeming irreplaceable bargman L-66 handle/lock combo thingy. Easy to take off. Next I took out all the screws that I could find and... the door was still in one piece. So upon closer inspection I found that there were some staples as well. Okay. So I began pulling staples. And more staples, and more and more and more. Who put these thing together?? Arg! Finally after a million staples, I reached the door's center I ran into some special guests, wasps. Luckily it was cold on Saturday night, so they weren't attacking me - but I made my dad kill them anyway! I hate wasps.

The door was now in pieces and I could see the yucky rotted frame. It looked like only the bottom and the area around the lock and handle were no good, but since it seemed like it would be an easy enough framing job, so we decided to rebuild the whole thing.

Here's what the old frame looked like:


Sunday morning I made a 7:30 am trip to Home Depot for sub floor glue, insulation, window sealant, and a tarp. When I got back I measured each piece of the old frame carefully and cut the new 2x2's to size. Once I was ready, my dad came out to help, and we discovered that measuring is NOT a talent of mine. Every piece had to be re-cut. Then when we started putting it back together we began to realize that the wood in the original door was not 2x2's but something just slightly smaller. Great. My dad solved the problem by shaving each piece on the table saw.

Here's what the new frame looks like:


Finally we began piecing the door back together. We had to take the lock side with all the horizontal supports already nailed to it, slide it in under the side, top and bottom metal lips, and then attach the hinge side to the frame.
It looked like my measurements were off again! The wood framing for the lock was visible from the front of the door. DARN. Oh well, my dad said he could fix that. So we moved on and cut the insulation to size and placed in into the door. Now we were ready to seal it up!!

My dad cut a piece of thin plywood and glued it down to the frame. Then he added a few staples to hold it into place. I had about 30 minutes before I had to call it quits and it looked like we were going to make it! The door was going to get finished!

OOPS. We forgot to notch out a place for the little plastic spacers. OH GREAT - and the plywood has been GLUED to the frame. Now what?

Well, we had to put the door aside until next weekend and try to come up with a plan to fix that little (big) problem. I was so sad.

Good news is that my dad found someone selling trailer parts for $80.00 on CL. Windows, doors, trim, drip caps, a table and more. This was a good find!! So I left Zippy behind and went to get the parts.

Next time on the Adventures of Zippy Lee...

We'll try to fix the door. Again. And more polishing, of course.

Polishing, Polishing, Polishing, Polishing, Polishing

Spent Saturday afternoon polishing. I polished the Shasta plate and 3 of the interior window surrounds and let me tell you - polishing is HARD WORK. It took me and my child slave laborer the entire afternoon and that's all we managed to get done. I feel like I'll be polishing forever and I still won't ever be done.

Just getting Started:


Close up:


After polishing:

Sunday, February 21, 2010

Replacing the floor

Sounds easy enough. Pull up the old stuff, put down some new stuff. Easy right? Um, 2 days later I am exhausted, and we didn't even get the new subfloor down! But we did get rid of all that asbestos tile (safely I hope) and all of that old, nasty insulation under the floor. While removing that gunk I found several abandoned lizard nurseries, but luckily nothing more gross than that. Interestingly, most of the floor supports were in good condition. On the interior we ended up only replacing 2. All the perimeter supports need to be replaced to some degree, but we have to put that part on hold - it seems they are stapled from underneath AND nailed from the underside of the skin, so getting them out is going to take some thought. All in all after 2 days of hard work, Zippy looks worse, smells better, and is nowhere near done. All in good time.

After taking out what was left of the bathroom (Front to back):


and back to front:

And after day 2:

Close up... supports look to be in good condition. Minimal rust on metal underside (nice surprise!)

But the perimeters and corners are shot:

Things to note: One of the panels from the ceiling caved in today, luckily I was a foot away from it's path! I keep getting harassed by wasps - I think they want to move in. The door is falling off. It has nothing to hold onto, the wood is so rotted it's just crumbling away! My dad wants to replace the skin. I feel like that's cheating. I wish I had more time to work on Zippy!

Next Time on The Adventures of Zippy Lee...
Continue to repair sub floor water damage, lay new subfloor. And I MAY take an 8 hour round trip to get a rear window and some other parts. I still don't know if it's worth the time and gas...

Tuesday, February 9, 2010

Color Schemes/Fabrics

I'm leaning towards cream and mint for Zippy. With maybe some aquas and browns?

This is pretty for curtains, or maybe even upholstery.

This is nice too:

I hope to paint mine something like this (Isn't this is the prettiest shasta EVER??)

Bed/Sofa/Daybed/Chair Ideas

AH, how much do I love this slide out day bed?? SO MUCH!


But this is what I'm really looking for! I'm going for something like this FOR SURE, but with the slide out feature from the one above...


Interior Paneling Ideas

I want Zippy's paneling to shine like this! PRETTY!

Storage/Cabinet Ideas

Love this...

This is cool, something similar would work well for me...

CUTE:

These are REALLY neat. Perfect for the store!

I want to find something like this for my kitchenette. LOVE IT.

these shelves are cute, they'd be good for the shop!


Missing the Zip

I'm so anxious to get my camper rolling that I'm finding it hard to sit here, so far away, doing nothing! 2 weeks before I can get back out there. In the mean time I'm obsessed with finding parts. I think I may have found a rear window, but it's 4 hours away... is it worth the drive? Maybe I'll go over to Lowes and get some "green' paint stripper to take care of the cabinet hardware. It'll give me something to do at least!

Monday, February 8, 2010

Gutting Zippy - Days 1 & 2


I'll admit I know nothing about trailer restoration, or anything automotive for that matter. My dad knows about cars and stuff, but I think this is his first trailer restoration, so we are sort of winging it. The plan for Day 1? Gut the interior.

Here's Zippy's insides BEFORE:

STUPID AC. I wish the window had been saved. :-(


Lot's of ugly 60's cabinets...


Stove is in pretty decent shape, but probably won't keep it...


Table looks good, it's a keeper!


AND HERE'S HIS INSIDES DURING...

We found a monstrosity of a water tank. This baby was HEAVY. Needless to say it's NOT going back in.


Front dinette removed. Looks like some water damage in that front street side corner.


Starting to take down those horrendous cabinets...

Pulled out the old water heater. The floor is so rotted under there!

Here's a better view of the floor where the water heater was after I got it all cleaned out. Well, if you can call that clean!

Pulled out the fridge and discovered more massive rotting. The wood crumbles like wet sand when you touch it. Also found a half dozen dead lizards who appear to have been the victims of a bug bomb, found numerous abandoned wasps nests, socks, papers, candy, forks, and lots of wire hangers. Mommy Dearest would not be happy.

After removing the heater (Had to cut through the tube at the back, cause we couldn't figure our how to take it apart) we were left with this mess... See the major rotting to the left of the wheel well? That's where the lizard graveyard was. :-( R.I.P.

Another view... That piece of wood just above the vent literally crumbled away right in front of me!

The whole area by the front door is in bad shape.

We decided to leave the shower/toilet room for another day, so the gut project is 90% complete!

And here are Zippy's insides AFTER:

View from front to back:


And back to front:


It's supposed to rain, so we tarped him up 'till next time, not that any more water would make a difference!

Next Time on The Adventures of Zippy Lee...
We plan to take out the old shower/toilet room, and pull up the floor, repair any damage under the sub floor, and lay a new subfloor.